With just two natural ingredients—baking soda and white vinegar—you can effectively remove grease, loosen burnt-on residue, and leave your gas stove top looking fresh and clean.
Why Use Baking Soda and Vinegar?
Baking soda and vinegar are popular natural cleaning agents because they are inexpensive, readily available, and effective.
Baking Soda
- Acts as a gentle abrasive
- Helps break down grease and grime
- Removes stains without scratching most surfaces
White Vinegar
- Dissolves grease and mineral deposits
- Helps disinfect surfaces
- Cuts through stubborn residue
Together, they create a powerful cleaning combination that can tackle even tough kitchen messes.
What You’ll Need
- ½ cup baking soda
- White vinegar in a spray bottle
- Warm water
- Soft sponge or microfiber cloth
- Old toothbrush or small cleaning brush
- Dry towel
Step 1: Make Sure the Stove Is Cool
Before cleaning, ensure the stove is completely turned off and cool to the touch. Never apply cleaning solutions to a hot surface.
For safety:
- Turn off all burners
- Disconnect power if recommended by the manufacturer
- Remove any loose food particles
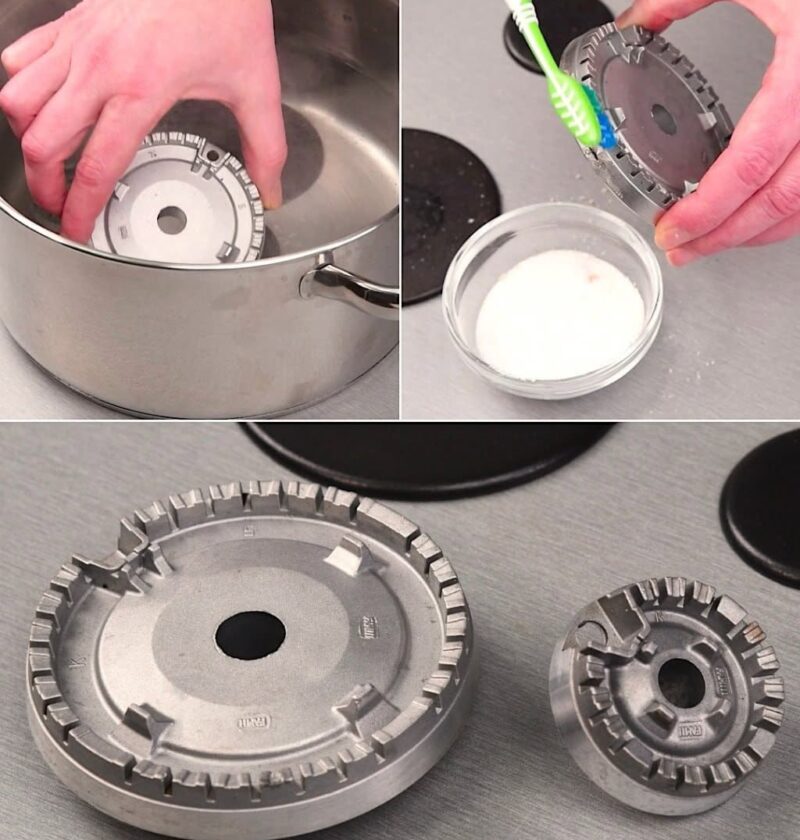
Step 2: Remove Grates and Burner Caps
Take off the stove grates and burner caps and place them in a sink filled with warm water.
Allow them to soak while you clean the stove top. This helps loosen grease and burnt residue, making them easier to clean later.
Step 3: Apply Baking Soda
Sprinkle a generous layer of baking soda over the entire stove surface, paying special attention to greasy and stained areas.
The baking soda will help lift dirt and act as a mild scrubbing agent without damaging the finish.
Step 4: Spray with White Vinegar
Lightly spray white vinegar over the baking soda.
You’ll notice a fizzing reaction. This bubbling action helps loosen grime and break down stubborn buildup.
Allow the mixture to sit for 10–15 minutes.
Step 5: Scrub Gently
Using a damp sponge or microfiber cloth, gently scrub the stove top.
For difficult areas:
- Use circular motions
- Apply slightly more pressure on stubborn stains
- Use an old toothbrush to reach corners and burner edges
Avoid using steel wool or highly abrasive scrubbers, which can scratch the surface.
Step 6: Wipe Clean
Once the grime has loosened, wipe the entire surface with a clean, damp cloth.
Rinse the cloth frequently and continue wiping until all baking soda residue is removed.
You should begin to notice a cleaner, brighter finish.
Step 7: Clean the Grates and Burner Caps
After soaking, sprinkle baking soda on the grates and burner caps.
Spray lightly with vinegar and scrub using a brush or sponge.
Rinse thoroughly with warm water and dry completely before replacing them.
Step 8: Buff for a Like-New Shine
Use a dry microfiber cloth to polish the stove top.
This final step removes any remaining moisture and helps restore the surface’s natural shine.
Tips to Keep Your Stove Looking New
- Wipe spills immediately after cooking
- Clean the stove top weekly to prevent buildup
- Use splatter screens when frying foods
- Avoid harsh chemical cleaners when possible
- Dry surfaces after cleaning to prevent streaks
Common Mistakes to Avoid
Using Abrasive Tools
Rough scrubbers can scratch enamel, stainless steel, and glass surfaces.
Letting Grease Sit Too Long
The longer grease remains, the harder it becomes to remove.
Reassembling Wet Parts
Always ensure burner caps and grates are completely dry before reinstalling them.
Conclusion
You don’t need expensive products to restore your gas stove top. With just baking soda and white vinegar, you can remove grease, loosen burnt-on food, and bring back a clean, polished appearance. Regular maintenance and quick cleanup after cooking can help keep your stove looking almost as good as new for years to come.
A few simple ingredients, a little patience, and some gentle scrubbing are often all it takes to transform a dirty stove into a sparkling centerpiece of your kitchen.